5V for electronics it’s getting older but sometimes you need to connect a 5V system to a 3.3V device. A typical example is connecting an Arduino to, let’s say, a MMA8452Q accelerometer. In this particular case you need to connect the I2C bus (and optionally the 2 interrupt pins) of the MMA8452Q to the I2C port of the Arduino (A6 and A7). While it just might work, most of the times the 3.3V device performance will be degraded, or it would suddenly stop working. While there are some tricks to inter-connect systems with different voltages, there are situations in which you can’t avoid it. Like when using a 3.3V ARM Cortex and you need to use a 5V only sensor, or a modem with 1.8V communication signals.
For these and other situations, the safest way is to use a level converter. The level converter will, well, convert a high voltage signal to a low voltage signal and viceversa. In this tutorial we will learn about the Texas Instruments TXS0108 and the AK-TXS0108 V2 breakout board.
The AK-TXS0108 V2 Eight Bidirectional Logic Level Converters
The TXS0108 is divided in two domains: the A domain and the B domain. On the A domain side you will connect your low voltage device. On the B domain side you will connect your high voltage device.
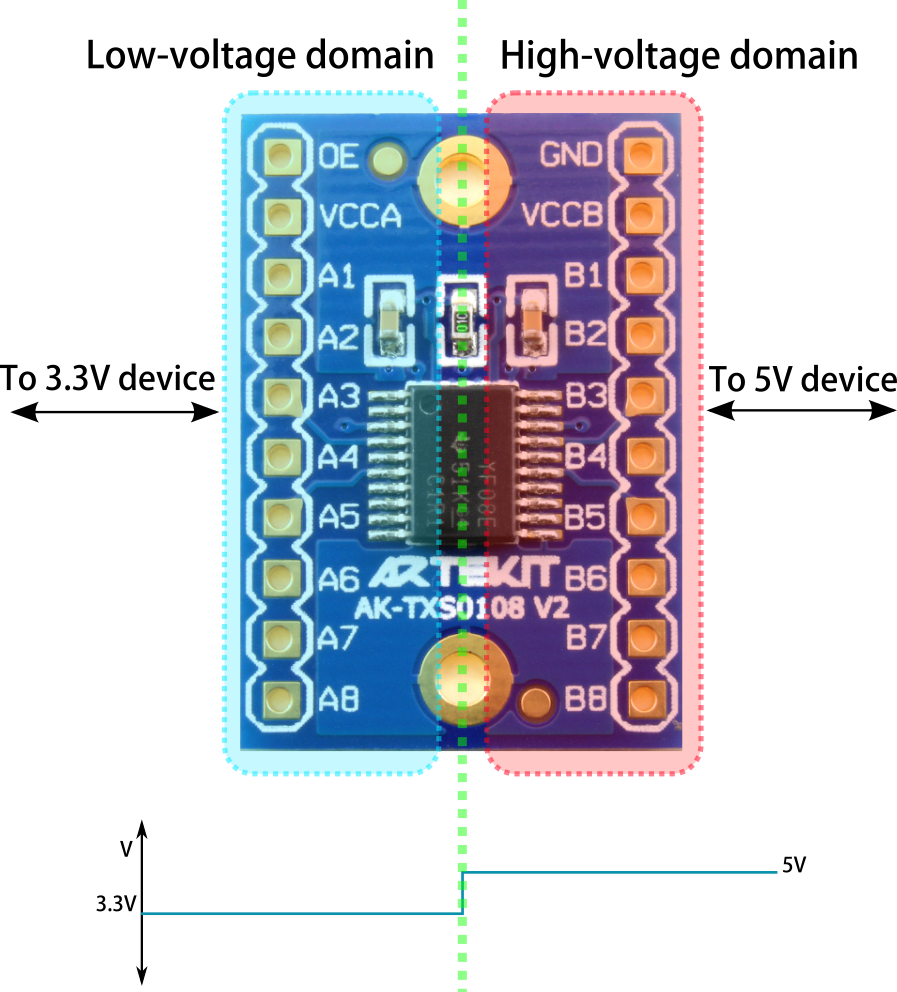
As you can see in the picture, the TXS0108 has 8 A and 8 B pins, a GND pin and a VCCA pin and a VCCB pin. In the VCCA pin you will connect your low voltage reference level (3.3V for example). This mean the TXS0108 will sense and will output the VCCA voltage reference on the A pins. The same applies for the VCCB pin: here you will connect your high voltage level (5V for example), and the TXS0108 will sense and output the VCCB reference voltage on the B pins.
The result: whenever you put a 3.3V logical 1 into one of the A pins, a 5V logical 1 will be output on the corresponding B pin. Many level converters out there are unidirectional. This means the level converter works only in one way, where one pin works as a input and the other as an output. This is not the case of the TXS0108 , because it is bidirectional. This mean a pin can be used as an input or an output at the same time, without needing any extra configuration.
You may have noticed we are only talking about 5V and 3.3V. That is because these are the most common cases, but with the TXS0108 you can drive from 1.2V up to 3.6V on the low-voltage domain, and from 1.65V to 5.5V on the high-voltage domain. Any voltage in that range will be conveniently converted.
TXS? TXB?
The Level Converter can be found in two flavors: the TXS line, and the TXB line. The TXS line is optimized to work on open-drain outputs as I2C or 1 wire, where the lines are bidirectional, and their direction changes from one way to the other (input <-> output), and where there is a shared bus. The TXB line is optimized to work with push-pull outputs lines, as SPI or mono directional lines.
Artekit Labs ships both the AK-TXS0108 and the AK-TXB0108 boards.
TXB type features:
- Auto-sensing (no DIR control needed)
- Medium data rate (up to 100Mbps)
- Low power consumption
- Hi-Z if VCCA or VCCB = 0V
- Optimized for push-pull signals.
TXS type features:
- Auto-sensing (no DIR control needed)
- Optimized for open drain signals (I2C, 1 wire)
- Low data rate (up to 40 Mbps)
- Hi-Z if VCCA or VCCB = 0V
Connection Example
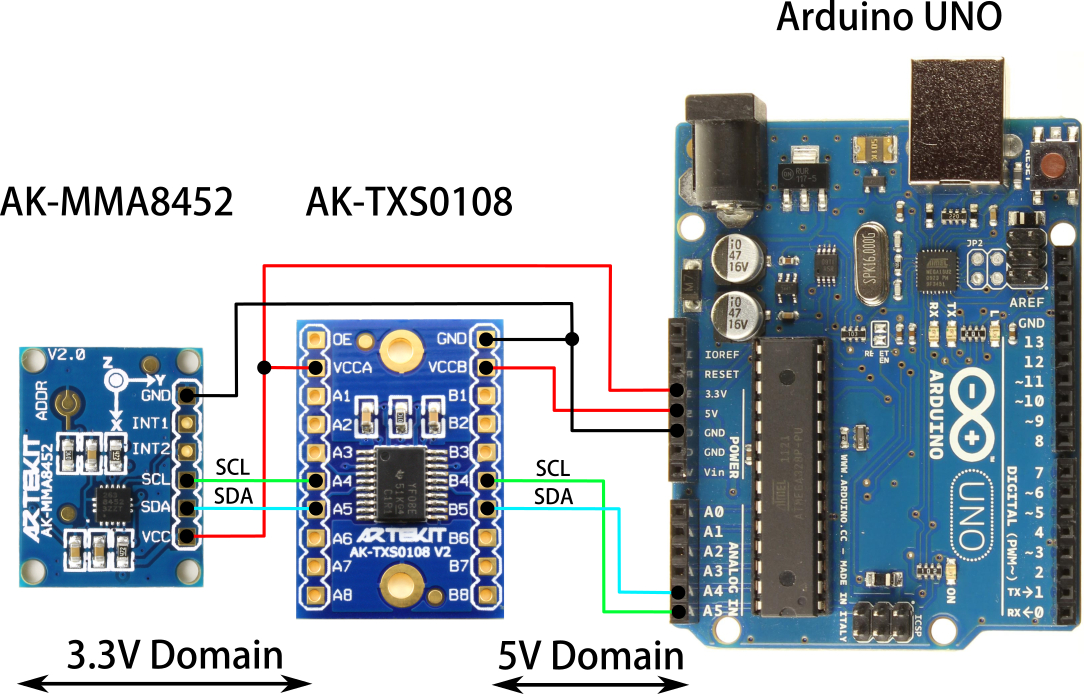
The following picture illustrates how to connect a 3.3V device (Artekit’s AK-MMA8452 accelerometer breakout) to a 5V Arduino UNO. This is one of the most classic situations where a level converter is more than useful: I2C communication. You can see that is very simple and straightforward to use a logic level converter. The INT1 and INT2 signals are not connected on the example above, just for a matter of simplicity of the drawing. You can connect them for example to A1 and A2. Then from B1 and B2 to any of the Arduino UNO digital inputs.
Conclusion
With this tutorial we have briefly covered why and how you can use a level translator. Click here to read the TXS0108 datasheet. It will give you a very accurate insight of how the level translation takes place.
Have fun!
The Artekit Team.



5 Responses
Hmm, definitely looks as if I need some of these to connect my Raspberry Pi to some of the 3.3V AK-XXXX I2c modules, don’t I ? 😉
Hi Laurence,
The RPI is already 3.3V, so you don’t need it for 3.3V devices. You may want to use one if you use 5V devices like the AK-DS1307.
I tried to use TXS0108E for RX/TX between NodemCU Lolin and Arduino UNO. It doesn’t work. However, I can send from NodeMCU (TX) to Arduino (RX) with a direct cable.
I would like to use a Level Shifter in order to have voltage protection and have also connection from Arduino TX to NodeMCU RX.
Hi, are you using specifically the AK-TXS0108 V2 board or just a generic TXS0108E IC?
In any case it’s better to check the signals with an oscilloscope to understand what is going on.
Generic TXS0108E
I solved it with another shifter:
http://forum.arduino.cc/index.php?topic=406261.msg3068160#msg3068160
Perhaps I was in a Bus Contention situation, https://en.wikipedia.org/wiki/Bus_contention
Thanks!