In this guide we are going to explain how to install and how to use the AK-Mr.Wood-L Library for Arduino. This library contains quick access to common tasks when using a shift register with 7-segment displays. It’s based mostly on the standard shiftOut() function. The library contains a predefined ASCII table for all printable characters and numbers.
Library installation
This part is very easy and if you have installed other libraries for Arduino in the past, you are familiar with the process. Let’s start downloading the library zip file (MrWoodLibrary.zip), from the product page or by clicking here for a quick link. Launch the Arduino IDE and open the Sketch menu and select Import Library. Then click on Add Library. Select the MrWoodLibrary.zip file that you have downloaded and click on Open. After that verify that the library is correctly installed by clicking on the Sketch menu, then on Import Library. You will see the MrWood entry at the bottom of the menu, under the Contributed label. 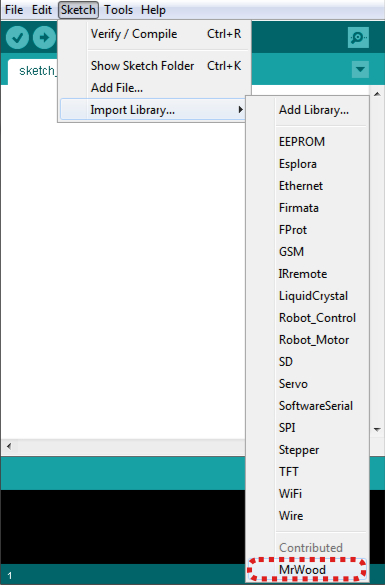 Select the MrWood library from the Import Library drop-down menu. You will see the #include <MrWood.h> line in your sketch now.
Usage
The AK-Mr.Wood-L library contains an initialization function and several control functions. Here is a list:
 void init(int32_t iQty, int32_t iSRCLK, int32_t iSCLK, int32_t iSER, int32_t iOE);
 void enable();
 void disable();
 void clear();
 void dimmer(uint8_t ucPercent);

 void printChar(uint8_t ucChar, bool bDecimal = false);
 void printChars(uint8_t* ucChars, uint32_t ulLength);
 void printFormatted(char* pszString, uint8_t ucAlign = ALIGN_LEFT);
 void printInt(int32_t iNum);
 void printFloat(float fNum, int8_t iTotalLength, uint8_t ucPrecision);

 void printByte(uint8_t ucByte);
 void printBytes(uint8_t* ucBytes, uint32_t ulLength);
All these functions are inside the Artekit_MrWood class that you can instance in the following way:
/*
 * Initialize MrWood.
 * 4 displays, SRCLK on pin 13, SCLK on pin 11,
 * SER on pin 12, OE on pin 10.
 */
Artekit_MrWood MrWood(4, 13, 11, 12, 10);
There is also a class constructor with no parameters. If you instance the class using that, you need to call the init() function before calling any other function. Now, let’s see every function in detail:
The init() function
This function is the first function to call if you have instanced the class using the constructor with no parameters.
You can call it from the setup() function. With this function you initialize the library. The iQty parameter is the quantity of AK-Mr.Wood-L you are using. The iSRCLK, iSCLK, iSER and iOE parameters indicate the Arduino pins the SRCLK, RCLK, SER and OE signals are connected. For example:
Artekit_MrWood MrWood;

void setup() {
 /* With this call we are initializing the library for 4 AK-Mr.Wood-L with:
  * the SRCLK signal on pin 13, the RCLK signal on pin 11,
  * the SER signal on pin 12 and the OE signal on pin 10.
  */
 MrWood.Init(4, 13, 11, 12, 10);
}
The clear() function
Call this function to clear all the displays. Since the clear pin is not available in the AK-Mr.Wood-L board, this function will shift out empty spaces (ASCII 0x20) according to the iQty quantity of displays declared when initializing the class (on constructor) or when calling the init() function.
The enable() and disable() functions
The enable() function enables the shift registers by setting high the OE pin. It is automatically called when you instance the class or when calling the init() function.
The disable() function disables the shift registers by setting low the OE pin.
The dimmer() function
This functions uses Arduino PWM to move the OE pin and produce a dimming effect. You can pass to this function a value from 0 to 100 representing the duty cycle of the PWM. Be sure to connect the OE pin to a PWM-capable Arduino pin.
The printByte() and printBytes() function
The printByte() function will shift out a byte. The ucByte parameter is the byte to shift out.
The printBytes() function instead of shifting out a single byte it shifts out an array of bytes. It accepts two parameters: ucBytes is a pointer to an array of bytes and ulLength is the length of the array, in bytes.
Note that in this case the output is not converted using the internal ASCII table. For example:
/* This call will turn on all the LEDs of the display */
MrWood.printByte(0xFF);
The printChar() and printChars() functions
These functions print ASCII characters or numbers converted using the internal ASCII table. The printChar() function accepts two parameters: ucChar is the character to print and bDecimal is a boolean that when true, it also prints the decimal point.
printChars() is used when printing an array of characters. The ucChars parameter is a pointer to a character array, and ulLength is the length of the array in bytes. The ucChars array may be or not null-terminated. For example:
char hello_array[] = {'h','e','l','l','o'};

MrWood.printChar('a'); /* Prints the 'a' character */
MrWood.printChar('a', true); /* Prints the 'a' character including the decimal point. */
MrWood.printChar(hello_array, 5); /* Prints "hello" from the hello array */
MrWood.printChar("ciao", 4) /* Prints "ciao" */
The printFormatted() function
This is a special function that prints ASCII strings. If the string has decimal points (the ‘.’ character) it will print them automatically. You can print the string left-aligned or right-aligned. Also, it will automatically print uppercase and lowercase W and M characters using two display for each character (otherwise they cannot be clearly printed on a 7-segment display).
The function accepts two parameters: pszString is the string to print (it has to be null-terminated), and ucAlign that can be either ALIGN_LEFT to align the string to the left, or ALIGN_RIGHT to align the string to the right. The alingment is calculated based on the quantity of display declared when instancing the Artekit_MrWood class or when calling the init() function.
The printInt() and printFloat() functions
These two functions are for printint numbers. The printInt() will print an integer number as is, including negative sign if present.
The printFloat() function will print a floating point number, included decimal point and negative sign. The last function accepts three parameters: fNum is the float to print, iTotalLength is the minimum quantity of characters that the resulting string will containt (including decimal point and sign, for example “-12.34” has a minimum iTotalLength of 6), and ucPrecision is the quantity of numbers after the point.
A simple program using the library
Now let’s write a simple program.
#include <MrWood.h>

/*
 * Initialize MrWood by instancing the Artekit_MrWood class.
 * 4 displays, SRCLK on pin 13, SCLK on pin 11,
 * SER on pin 12, OE on pin 10.
 */
Artekit_MrWood MrWood(4, 13, 11, 12, 10);

void setup() {
 /* Nothing to initialize... */

 /* Clear the display */
 MrWood.clear();

 /* Print "Ciao" */
 MrWood.printFormatted("Ciao");
}

void loop()
{
 /* Nothing to do... */
}
 Now let’s try something bigger (20 displays). This code shows the automatic representation of the W and M characters using the printFormatted() function.
#include <MrWood.h>

/*
 * Initialize MrWood by instancing the Artekit_MrWood class.
 * 20 displays, SRCLK on pin 13, SCLK on pin 11,
 * SER on pin 12, OE on pin 10.
 */
Artekit_MrWood MrWood(20, 13, 11, 12, 10);

void setup() {
 /* Nothing to initialize... */

 /* Clear the display */
 MrWood.clear();

 /* Print "Meet Mr. Wood" */
 MrWood.printFormatted("  Meet Mr. Wood");
}

void loop()
{
 /* Nothing to do... */
}

More code
If you are here it is possible that you have already seen the video we have prepared for the AK-Mr.Wood-L. You can find the code we used for the video on the product page and on GitHub.
The code is entirely based on this library for Arduino and it’s a nice starting point for adding cool graphics to your next project.
That’s it! Have fun!
The Artekit team.


 Select the MrWood library from the Import Library drop-down menu. You will see the #include <MrWood.h> line in your sketch now.
 Now let’s try something bigger (20 displays). This code shows the automatic representation of the W and M characters using the printFormatted() function.


